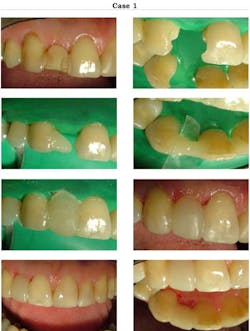
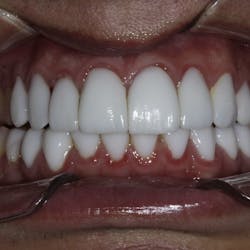
By Dr. Terrence ShawFor the past 20 years, I have restored about 600 missing teeth with composite pontics bonded to adjacent teeth. I started dental practice in 1976, and to replace missing single anterior teeth I placed many Maryland FPDs. Over that period of time, I saw many fail on one abutment or both and have to be recemented.In the early 1990s, I tried all-composite FPDs and saw the failure rate plummet. I never enjoyed removing enamel from anterior teeth to provide space for the metal framework for Maryland FPDs. The beauty of all-composite FPDs is the simplicity. Just acid-etch the adjacent teeth, add composite, and shape your pontic. Most dentists have seen articles about composite FPDs but many have never attempted them. You are only limited by your ability to shape, contour, and polish the restoration. One of the biggest dilemmas in dentistry is replacing a single front tooth. Your choices are several. First would be an implant, but in my world not everyone can afford $3,000 for a single tooth. Next might be a fixed FPD using porcelain or porcelain to metal, but again the cost is similar to that of an implant. A flipper partial or conventional RPD is still expensive and quite undesirable from a hygiene perspective. This is where a bonded composite FPD will provide a viable alternative to the problem.It is possible to extract the problem tooth, place a gauze for 10 minutes on the area to stop bleeding, then place a rubber dam and go to work. After placing several of these restorations, you can do them in about an hour. You can use a microhybrid (for strength) for the palatal part and veneer the labial with a microfill for esthetics (higher polish). Nearly everything has a finite lifetime and if and when the FPD cracks, it is much simpler to repair. In about 20 minutes you can open the fracture line with a diamond, cut a couple of grooves, sandblast, and rebond. Very seldom have I had a composite FPD come out completely. They usually crack on one abutment and then you have a cantilevered FPD. I have seen patients come in six months after fracturing one abutment and not be too concerned that there was slight movement in the pontic. The bottom line is these restorations are very durable. I have many that have not been touched for five to 10 years. I started doing them as a somewhat temporary solution, but now I feel they are more than that. A youngster just out of braces with missing laterals is a perfect candidate for composite FPDs, as is a young person under age 18 or so who eventually will receive an implant.The service of providing composite FPDs should be part of every dentist’s armamentarium. I use a contoured matrix strip that is tapered with the larger end on the labial and the smaller end toward the palate. Sometimes I reverse the strip, depending on the alignment of the teeth. When you pull the matrix strip toward the palate, the edges will catch interproximally and give you a nice shape on the gingival. I hold the labial part on the gingiva to give a contact on the gingival area. Following are three cases of increasing complexity.Case 1: A composite bonded denture tooth replacing a right maxillary lateral in 1983. I tried to get the patient to let me replace this tooth years ago, and she relented in 2007. I removed the remains of this denture tooth and used 3M ESPE’s Filtek™ Z250 composite A2 to build a new tooth for her. I acid-etched her adjacent teeth and bonded composite. The contoured matrix band (Premier Cure-Thru Anatomical Matrix Band) is cut to slide against the adjacent teeth to provide shape and smoothness on the gingival surface.
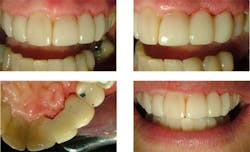
Case 2: This case from 1994 features a composite FPD done with 3M ESPE’s Z100™ A3 originally to replace the missing right lateral. I reveneered the labial surface with Renamel® A1 in 1998. I added Renamel to the centrals as well. This was accomplished using a diamond to shave 1 mm from labial and micro-etched (sandblasted). In 1999, the patient cracked the distal joint of the FPD. A simple repair involved opening the fracture line with the diamond and then micro-etching and rebonding with composite. These pictures are from 2008 showing an excellent survival despite the minor complications.
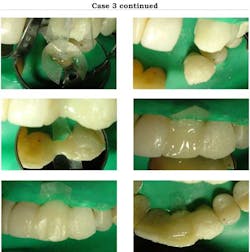
Case 3: In 2005, I restored the anterior teeth and bonded the labial surfaces as well to match the light color on the left canine crown, which had a left lateral pontic cantilevered to it. In 2007, the canine crown failed due to the short post and required the left lateral and canine to be replaced. I isolated the teeth with a rubber dam and used an Ivory 90N clamp to retract the gingiva around the canine. The Ivory 90N is like a 212 on steroids as it is very stiff and does not move once placed. I cemented a stainless steel passive post that had been sandblasted. Pink Opaquer (Cosmodent) was placed on the labial of the post and C&B resin cement (Bisco) was used. The distal surface of the left central was sandblasted and acid-etched and used to bond composite as the mesial abutment for the bridge. I shaped a Premier band to fit the space between the abutments and applied slight pressure to give a contact to the gingiva where the pontic contacts the tissue. This provides a smooth surface as well for the undersurface of the pontic.
Author bioDr. Terrence Shaw graduated from Dalhousie Dental School in Halifax, Nova Scotia, in 1976. He has practiced general dentistry in Perth-Andover, New Brunswick, since graduation. Dr. Shaw is currently the continuing education chairperson for the Atlantic AGD in eastern Canada. Perth-Andover is a rural community of 2,000 in northwestern New Brunswick near the Maine border, and 35% of his patients come from Aroostook County in Maine. Dr. Shaw has a special affection for composite dentistry.

