How to use a dental implant verification jig to ensure an accurate final framework every time
Editor's note: Originally published April 9, 2018. Reviewed May 24, 2022.
How can you ensure that your screw-retained dental implant restoration frame will fit properly? First, it's critical to take a good impression. There is much debate about the accuracy of closed- and open-top impression copings. We will cover both methods in this article.
Open-tray impressions
For the open-top—or open-tray—style of impression, place the impression copings on top of the implant or implant abutments one at a time. Place the screw guide pin through the impression coping. Tighten with your screwdriver.
Additional reading: Avoid a 'crack of shame': Consequence of unidentified inaccuracy during lab workflow for a full-arch implant-supported restoration
Place the open-top tray in the mouth to see where the pins come out. If the pins are lower than the tray, place a ball of wax on top of the pins. If the pins are higher than the tray, you can leave them as they are.
Fill your tray with the impression material. Place the tray into the mouth. Note that some of the material will ooze out of the open top. As the material hardens, clear away the material so you can access the balls of wax.
Once the material is hard, cut away the excess and pluck out the wax. Unscrew the guide pins. Remove the impression from the mouth. Replace your healing caps. Send the impression and guide pins to the lab for a master model.
Closed-tray impressions
For a closed-top tray, fill the tray with impression material. Inject some material around the impression coping. Place the tray into the mouth.
After the material hardens, remove the impression from the mouth. Remove the impression coping from the implants in the mouth and replace the healing abutments. Send the impression coping back to the lab with the impression.
How to use an implant verification jig
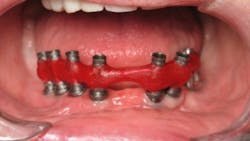
To ensure that your final screw-retained framework has the optimum passive seat, a verification jig (figure 1) is recommended. A verification jig is used to verify that the master model is accurate prior to manufacturing the framework.
The jig consists of temporary cylinders luted together with a rigid resin material and sometimes thick wire or rods. The purpose of the verification jig is to mimic the final frame in fit. To verify the accuracy of the model, place the jig on the model and in the mouth.
Place the jig on top of all of the implants in the mouth. Look for any sign of a rock in the frame. Screw in the most distal screw, and look to see if the frame lifts on the other side. Remove the screw and do the same on the most distal implant on the other side. Continue with this procedure until every screw has been tried in and no lifts are seen.
If you find no rocks, the model is accurate to the mouth. If the jig rocks anywhere, section the frame and relute it in the mouth until it seats passively without any rocks. The lab will then modify the master model with the jig, and the next step can begin.
If the jig does not fit the mouth, the model is incorrect. In this case, you must cut the jig and reconnect it in the mouth. Modify the model or make a second verification model.
This step will guarantee a properly fitting final frame, as well as avoid the expense and time required to resolder the connections and begin again by taking a new impression.
Also by the author ...
- Correcting malpositioned dental implants: Where do we go from here?
- The fall and rise of dental technology
- The changing face of dentistry
- Top 5 questions you should ask a dental lab before you send them a case
Editor’s note: This article originally appeared in Perio-Implant Advisory, a chairside resource for dentists and hygienists that focuses on periodontal- and implant-related issues. Read more articles and subscribe to the newsletter.
About the Author
Steven Pigliacelli, MDT, CDT
Steven Pigliacelli, MDT, CDT, has more than 30 years’ experience as a dental implant specialist. He is the owner and vice president of Marotta Dental Studio and serves as the technical liaison between the dentist and the laboratory. He also directs the lab’s GPR and Prosthetic Resident Rotation. He is a faculty instructor in postgraduate prosthodontics at New York University, College of Dentistry, in the department of prosthodontics. Contact him at marottadental.com or (866) 627-6882.
Updated August 2, 2023


