The advantages of having an in-office ceramic furnace in your dental practice
Becoming efficient at predictably achieving successful clinical outcomes is the goal for which most of us clinicians continually strive.
Working efficiently allows us to be profitable while at the same time offer the benefit to our patients of completing their required treatment in shorter or fewer appointments. Predictability, when it comes to achieving a desired clinical result, boosts our confidence in caring for our patients, minimizes stress, and strengthens a good reputation.
There are many dental products and equipment available today designed with the intent to appeal to our desire for efficiency, profitability, and predictability. In this article, I wish to highlight just one and share with you the advantages that we have found in our practice of owning an in-office ceramic oven.
“But Dr. Hanson,” you may say, “what use would I have for an in-office oven if I do not make my own crowns?” Even if you send your crowns out to be made by an off-site dental laboratory, the advantages of a ceramic oven in your office are still applicable, and will potentially increase your efficiency and elevate your ability to predictably achieve outcomes that you and your patients will be pleased with — in at least the following two ways:
1. Customization — The ability to blend … chairside!
It is likely that most of us can sympathize with trying in the crown at the delivery appointment and silently asking ourselves, Do I really want to seat this crown, or shall I send it back to the lab and see if they can alter the color or value slightly to help it blend in just a little bit better? Just the fact that we are asking the question is enough to confirm that sending it back is the right thing to do, but suddenly then, we are forced to face the following truth-serum flood of thoughts:
If I send this back, then we will have to make a new appointment ... AND get her numb again ... and she’s not going to be thrilled with wearing a temporary for another two weeks. Speaking of that, I am going to have to make her a NEW temporary now since we cut the last one off to try in the crown. How am I going to explain to her that our work didn’t turn out right? Do I blame it on the lab? Did I forget to send photos? Is she going to think that I don’t know what I am doing?
This silent thought-contained conversation has the potential to build on itself and quickly become mentally and internally straining! However, if there is a ceramic oven down the hall, along with some custom stains and glaze, this story may have a chance for a different ending.
You explain to your patient that you happen to have the technology in your office to customize her crown and make it “blend-in” even better! Thirty minutes later, satisfied with the esthetics, you are seating the patient’s new crown. You both feel great about the results. She is pleased with your artistic ability and now thinks “you are a magician” for blending her new tooth in so nicely with the rest of her smile. She says she will be referring her friends for sure!
Now, maybe that sounds simplified or a bit over-the-top to you, but you get the picture. You were efficient, there was no additional appointment, you achieved predictable esthetic results the first time around, and you finished with a pleased customer and a heightened sense of self-confidence — a much better ending to the story!
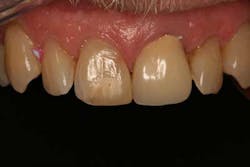
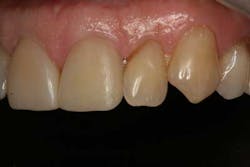
Fig. 1: Retracted 1:1 close-up view, pretreatment. Treatment planned: Replace bonding on tooth No. 8 and crown on No. 9.
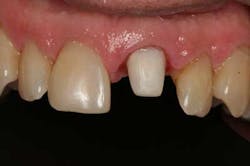
Fig. 2: Retracted 1:1 close-up view, mid-treatment. Bonding of tooth No. 8 previously completed, and tooth No. 9 immediately prior to crown try-in.
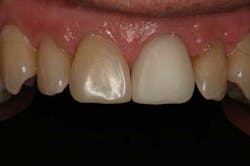
Fig. 3: Retracted 1:1 close-up view, crown try-in No. 9. Note value and hue of crown lack modification and customization in order to better blend in with the surrounding teeth.
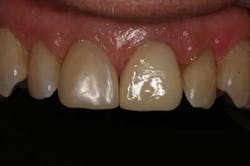
Fig. 4: Retracted 1:1 close-up view, customization. Illustrates how even a single layer of porcelain stain and glaze can quickly naturalize the shade and value of a restoration that was previously overly obvious and disharmonious.
Fig. 5: Retracted 1:1 close-up, right lateral view.
Fig. 6: Retracted 1:1 close-up, left lateral view. Post cementation No. 9. Note that within the same appointment, and after only one 26-minute cycle in the ceramic oven, that the crown was customized to blend in less perceptively with the surrounding dentition.
Proceed as follows to apply individualized characterizations and glaze:
- Thoroughly clean and dry the restoration after clinical try-in.
- Extrude glaze paste from the syringe and mix.
- Apply the glazing paste evenly to the entire restoration using a small brush.
- If characterizations are desired, the restoration can be individualized using shades and stains before firing.
- Extrude shades and stains from the syringe and mix thoroughly.
- The ready-to-use shades and stains may be slightly thinned using glaze liquid. However, the consistency should still remain pasty.
- Apply mixed shades and stains directly into the unfired glaze layer using a fine brush.
- Conduct the corrective firing if characterization is applied to an already crystallized restoration.
2. Ideal contacts — What was once left open can now be made closed … chairside!
Similar to the first example, the solution, when finding that the crown that we hope to deliver today has insufficient proximal contact, may require a long list of additional steps, lost time, and disappointment to both us and our patient. However, if there is a ceramic oven down the hall, along with some porcelain powder and liquid add-on, suddenly we have an alternative avenue available for ensuring predictable contacts every time at the delivery appointment.
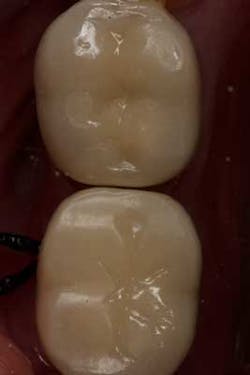
Fig. 7: Occlusal view of implant crown on tooth No. 30 with an open mesial contact.
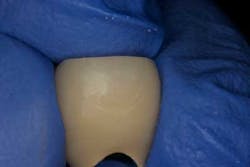
Fig. 8: Application of the ceramic add-on material to the mesial contact area.
Fig. 9: After the oven cycle, the add-on material is shaped and contoured.
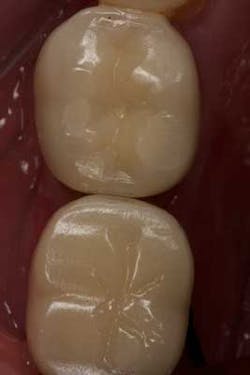
Fig. 10: The crown is tried in again to assess the proximal contact. It now appears closed.
Processing:
- Mix IPS e.max CAD Crystall/Add-On with IPS e.max CAD Crystall/Add-On Liquid to an easy-to-contour consistency. Ensure even mixing of the add-on material and the liquid in order to achieve an optimum firing result.
- Apply the mixed add-on material directly in the areas to be adjusted and fire.
- Conduct the corrective firing if Add-On is applied on an already crystallized restoration.
The advantages of using an in-office ceramic oven create opportunities in our office for increased efficiency and predictability that may not exist for us otherwise. Carefully selecting and utilizing the advanced materials and technologies that we have available today will assist us in attaining our goal as clinicians. There is an elevated feeling of confidence and satisfaction that can be discerned the closer we get to blending efficiency with predictability in achieving successful clinical outcomes for the patients in our practices. (This article highlights only one of the products or equipment that can help us get there.) And along our individual yet collective journey of “getting there,” we conclude that the feeling that comes with achieving such a goal is well worth the “striving for”!
In this video, Nelson Rego, AAACD, CDT, explains how to add a contact to an existing restoration.

